
I recently set up a GitOps workflow for a few Python microservices I’ve been working on, and I wanted to share how I did it. The whole thing turned out to be pretty clean once the pieces clicked together, so hopefully this saves you some time if you’re going down the same path.
What I Started With #
I had three Python applications (let’s call them application (a), application (b), and application (c)) that I built as part of a platform project. Each one had its own Dockerfile, and I built and pushed all three Docker images to my self-hosted Nexus registry. So at this point, the container images were sitting in Nexus, ready to be pulled by Kubernetes.
Next, I created a Helm chart for each application. Nothing fancy (just the standard deployment, service, ingress, and the usual Kubernetes resources). I packaged the charts and pushed them to the Helm repository in Nexus as well. So now Nexus was hosting both my Docker images and my Helm charts.
The missing piece was: how do I actually deploy these to my Kubernetes cluster in a repeatable, Git-driven way? That’s where ArgoCD and GitOps come in.
The Idea Behind the Setup #
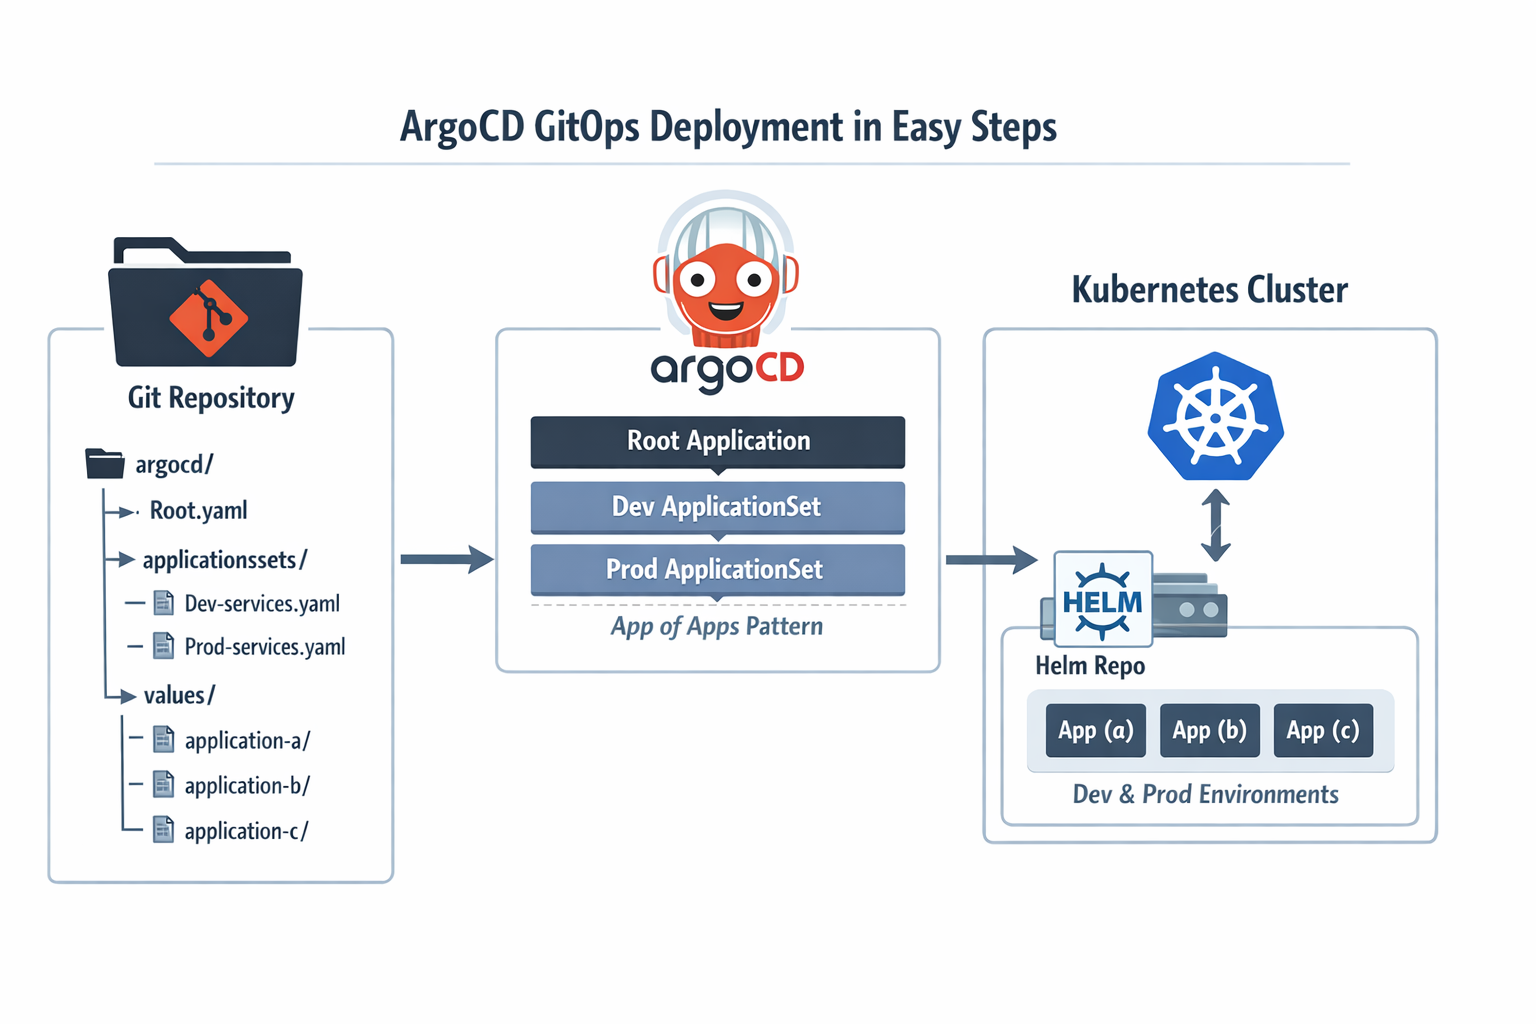
Instead of running helm install manually or writing CI/CD pipeline steps that talk to Kubernetes directly, I wanted a setup where I just push config to a Git repo and ArgoCD takes care of the rest. The repo wouldn’t contain any Helm charts (those are already in Nexus). It would only contain ArgoCD resources and the Helm values files for each app and environment.
Here’s the repo structure I ended up with:
platform-gitops/
└── argocd/
    ├── root.yaml
    ├── applicationsets/
    │   ├── dev-services.yaml        # ApplicationSet for dev
    │   └── prod-services.yaml       # ApplicationSet for prod
    └── values/
        ├── application-a/
        │   ├── dev.yaml
        │   └── prod.yaml
        ├── application-b/
        │   ├── dev.yaml
        │   └── prod.yaml
        └── application-c/
            ├── dev.yaml
            └── prod.yaml
Three layers:
- A single root Application that bootstraps everything.
- Two ApplicationSets that dynamically generate ArgoCD Applications (one for dev, one for prod).
- Plain Helm values files, one per app per environment.
Let me walk through each piece.
Step 1 (The Root Application) #
This is the only thing you apply manually (CLI or Argo CD UI). Once it’s in the cluster, ArgoCD watches the applicationsets/ directory in your Git repo and keeps everything in sync from there.
apiVersion: argoproj.io/v1alpha1
kind: Application
metadata:
  name: platform-gitops
  namespace: argocd
spec:
  project: default
  source:
    repoURL: git@github.com:your-org/platform-gitops.git
    path: argocd/applicationsets/
    targetRevision: main
  destination:
    server: https://kubernetes.default.svc
    namespace: argocd
  syncPolicy:
    automated:
      selfHeal: true
      prune: false
Before this works, ArgoCD needs credentials for both the private Git repository and the private Helm repository. If those repositories are not already registered in ArgoCD, the Applications will be created but won’t be able to sync.
Save this as argocd/root.yaml and apply it once:
kubectl apply -f argocd/root.yaml
I set selfHeal to true so that if anyone manually changes something in the cluster, ArgoCD reverts it (a bit like how an agent-based configuration management system such as Puppet keeps correcting drift when the live system no longer matches the catalog you defined). And I intentionally left prune as false on this root app (if the Git source has a hiccup, I don’t want ArgoCD to delete all my ApplicationSets in one go).
Step 2 (ApplicationSets for Dev and Prod) #
An ApplicationSet is basically a template that generates multiple ArgoCD Applications. I used the list generator, which means I explicitly list each service and its chart details. It’s straightforward and easy to reason about.
Dev ApplicationSet #
apiVersion: argoproj.io/v1alpha1
kind: ApplicationSet
metadata:
  name: dev-services
  namespace: argocd
spec:
  generators:
    - list:
        elements:
          - name: application-a
            helmRepoURL: https://nexus.example.com/repository/helm-charts/
            chart: application-a
            chartVersion: 0.1.0
            namespace: dev

          - name: application-b
            helmRepoURL: https://nexus.example.com/repository/helm-charts/
            chart: application-b
            chartVersion: 0.1.0
            namespace: dev

          - name: application-c
            helmRepoURL: https://nexus.example.com/repository/helm-charts/
            chart: application-c
            chartVersion: 0.1.0
            namespace: dev

  template:
    metadata:
      name: "{{name}}-dev"
    spec:
      project: default
      sources:
        - repoURL: "{{helmRepoURL}}"
          chart: "{{chart}}"
          targetRevision: "{{chartVersion}}"
          helm:
            valueFiles:
              - $values/argocd/values/{{name}}/dev.yaml

        - repoURL: git@github.com:your-org/platform-gitops.git
          targetRevision: main
          ref: values

      destination:
        server: https://kubernetes.default.svc
        namespace: "{{namespace}}"

      syncPolicy:
        automated:
          prune: true
          selfHeal: true
        syncOptions:
          - CreateNamespace=true
Prod ApplicationSet #
The prod version looks almost the same. The only differences are the environment name in the generated app names, the namespace, and which values file gets used:
apiVersion: argoproj.io/v1alpha1
kind: ApplicationSet
metadata:
  name: prod-services
  namespace: argocd
spec:
  generators:
    - list:
        elements:
          - name: application-a
            helmRepoURL: https://nexus.example.com/repository/helm-charts/
            chart: application-a
            chartVersion: 0.1.0
            namespace: prod

          - name: application-b
            helmRepoURL: https://nexus.example.com/repository/helm-charts/
            chart: application-b
            chartVersion: 0.1.0
            namespace: prod

          - name: application-c
            helmRepoURL: https://nexus.example.com/repository/helm-charts/
            chart: application-c
            chartVersion: 0.1.0
            namespace: prod

  template:
    metadata:
      name: "{{name}}-prod"
    spec:
      project: default
      sources:
        - repoURL: "{{helmRepoURL}}"
          chart: "{{chart}}"
          targetRevision: "{{chartVersion}}"
          helm:
            valueFiles:
              - $values/argocd/values/{{name}}/prod.yaml

        - repoURL: git@github.com:your-org/platform-gitops.git
          targetRevision: main
          ref: values

      destination:
        server: https://kubernetes.default.svc
        namespace: "{{namespace}}"

      syncPolicy:
        automated:
          prune: true
          selfHeal: true
        syncOptions:
          - CreateNamespace=true
How Multi-Source Apps Work #
The key thing to notice is the sources block. Each generated Application has two sources:
- The first source pulls the Helm chart from Nexus (where I pushed my charts earlier).
- The second source points to this same Git repo with
ref: values, which creates a$valuesalias.
When ArgoCD sees $values/argocd/values/application-a/dev.yaml, it knows to fetch the chart from the Helm repo but overlay it with values from that file in Git. This is what makes the separation work (charts live in Nexus, config lives in Git). Just keep in mind that ArgoCD still needs access to both repositories up front.
Step 3 (Per-Environment Values Files) #
These are just standard Helm values files. Each app gets a dev.yaml and a prod.yaml with the overrides for that environment. In these examples, I assume the referenced secrets already exist in the cluster and are managed separately.
Dev values for application (a) #
replicaCount: 1

imagePullSecrets:
  - name: registry-credentials

ingress:
  enabled: true
  className: traefik
  hosts:
    - host: dev-app-a.example.com
      paths:
        - path: /
          pathType: Prefix
  tls:
    - secretName: dev-app-a-tls
      hosts:
        - dev-app-a.example.com
Prod values for application (a) #
replicaCount: 2

imagePullSecrets:
  - name: registry-credentials

ingress:
  enabled: true
  className: traefik
  hosts:
    - host: prod-app-a.example.com
      paths:
        - path: /
          pathType: Prefix
  tls:
    - secretName: prod-app-a-tls
      hosts:
        - prod-app-a.example.com
Pretty simple. Prod gets more replicas and a different hostname. You can add whatever else your chart supports here (resource limits, environment variables, autoscaling rules, and so on).
Step 4 (Adding a New Application) #
This is where the whole setup pays off. Say I build a fourth Python service, containerize it, push the image to Nexus, create a Helm chart for it, and push that to Nexus too. To get it deployed through ArgoCD, I only need to:
- Add a new entry to the list generator in both ApplicationSets:
- name: application-d
  helmRepoURL: https://nexus.example.com/repository/helm-charts/
  chart: application-d
  chartVersion: 0.1.0
  namespace: dev
- Create the values directory and files:
mkdir -p argocd/values/application-d
Then write dev.yaml and prod.yaml with the appropriate overrides.
- Commit and push.
That’s it. No clicking around in UIs, no running helm install, no updating CI pipelines. ArgoCD picks up the change from Git and creates the new Application automatically.
Step 5 (Applying and Verifying) #
Once your repo is ready and you’ve applied the root app:
kubectl apply -f argocd/root.yaml
You can check that everything came up:
kubectl get applicationsets -n argocd
kubectl get applications -n argocd
You should see six Applications (three per environment), all synced and healthy.
A Few Practical Notes #
Pin chart versions. Don’t use wildcards like *. Use a fixed version so you always know what is running, and test it in dev before prod.
Keep prune off on the root app. If your Git source is broken or temporarily empty, you don’t want ArgoCD deleting all your ApplicationSets by mistake.
Turn on selfHeal. If someone changes something by hand in the cluster, ArgoCD will bring it back to what is in Git.
Think about how prod should sync. In this example, prod auto-syncs from main to keep things simple. In a stricter setup, you might prefer manual sync, a release branch, or tags.
Use CreateNamespace. It lets ArgoCD create the dev and prod namespaces for you if they don’t exist yet.
Wrapping Up #
This setup gave me a simple way to deploy my apps with Git. I build and push the image, publish the Helm chart, update the values or chart version in the GitOps repo, and ArgoCD takes care of the rest.
Once the structure is in place, adding a new service is quick.
I left a few production topics out on purpose. I didn’t cover AppProjects, secrets management, or access and SSO in this post. I’ll write separate posts about those, including ArgoCD with Keycloak. If you want to look into that now, the official ArgoCD Keycloak guide is a good place to start.